Report objects on a Time Series Slider widget can be defined as selectors, as described in Viewing data related to a widget: Using a widget as a selector. In Flash Mode in MicroStrategy Web, users can then interact with the widget to control targeted Grid/Graphs and panel stacks in the document. For more information on Time Series Slider widgets, see Creating a Time Series Slider widget.
In Desktop, or in Design Mode or Editable Mode in MicroStrategy Web, you must define one or more of the objects on the Grid/Graph that contains the widget as selectors.
Next, switch to Flash Mode to use the primary graph at the bottom of the widget as a selector. You can hover over and select an individual data point in the graph to display related data in the target Grid/Graphs and panel stacks. For example, if you select the data point for January 2006 revenue, all data in the target Grid/Graphs and panel stacks is updated.
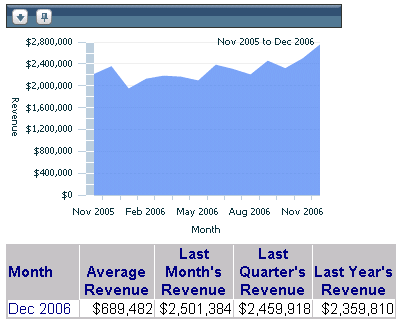
The following document is shown in Flash Mode in MicroStrategy Web. Revenue data related to the last data point in the Time Series Slider widget, in this case December 2006, is shown in the grid report below the widget.
If you click the data point for January 2006, the grid report displays the revenue data related to that date, as shown below.

This example uses the primary graph as the selector, but you can change it to use the slider instead. Instead of clicking a single data point (in this case, a single month) you can instead select a range of months. In the following example, the slider is set to January 2006 through June 2006, and the grid report displays the data for that time frame.

The following tasks are described below:
You can specify whether the primary graph or the slider is used as the selector. The primary graph allows the user to select an individual element, while the slider allows the user to select a range of elements. For steps, see To determine which part of a Time Series Slider widget is enabled as a selector.
You can ensure that target Grid/Graphs and panel stacks are updated when a user hovers over a data point in the primary graph, instead of clicking the data point. For instructions, see To update targets in a Time Series Slider widget when the cursor is hovered.
For more information on using widgets as selectors, see Viewing data related to a widget: Using a widget as a selector.
To use a widget as a selector, you must first enable the widget as a selector in Design Mode or Editable Mode. You can also enable the widget as a selector in Desktop. For steps, see the Desktop Help.
The document must contain a widget with the report objects that you want to use as selectors. For instructions to add a widget, see Inserting a widget into a document.
The document must also contain the panel stack or Grid/Graph to use as the target. The selector and target must have an attribute in common. For instructions, see Inserting a panel stack into a document or Adding a Grid/Graph to documents.
Open the document in Design or Editable Mode.
Do one of the following:
In the widget's Grid/Graph, right-click the header of the attribute, custom group, or consolidation that you want to use as the selector, and select Use as Selector. The Configure Selector dialog box opens.
Right-click the Metrics column in the Grid/Graph, and select Use as Selector. The Configure Selector dialog box opens.
Note: If targets are automatically maintained in the document, the selector is automatically created and the Configure Selector dialog box is not opened. To specify selector options, such as the target of the selector, right-click the new selector and select Edit Selector. The Configure Selector dialog box opens.
Select the target Grid/Graph
or panel stack in the Available Targets
list on the left, and click >
to add it to the Selected Targets
list on the right. You can select multiple targets.
Note: If targets are automatically maintained in the document,
the selector automatically targets all Grid/Graphs and panel stacks in
the current panel or section of the document. You can disable automatic
target maintenance and choose targets manually by clicking click
here in the Configure Selector dialog box. For more information
on automatically maintaining selector targets, see
Automatically
maintaining targets for selectors.
You can specify whether the selector is used to filter data displayed in the target, or determine how the data is sliced. For more information, see Applying selections as filters or slices. Do one of the following:
To use the selector to filter data, select the Apply selections as a filter check box.
To use the selector to slice data, clear the Apply selections as a filter check box.
The All option allows the user to display data for every element in the selector. For example, the Region attribute is enabled as a selector. If the user selects the All option, data for every region is displayed in the selector's target. To enable the All option, select the Show option for All check box. If the check box is selected:
The header names of attributes, consolidations, or custom groups in the widget's Grid/Graph can be used as selectors in Editable Mode.
The Total option allows the user to display the total for all attributes, custom groups, consolidation elements or metrics in the targeted Grid/Graph or panel stack. To display totals, select the Show option for Total check box.
You can determine the behavior of the selector's target when no data exists for the current selection. This option can be used to create selectors that update other selectors. For more information, see Determining how the target of a selector displays when no data exists.
To display a message that no data is returned, clear the Automatically update when there is no data for the current selection check box.
To automatically update the selector and display an item, select the Automatically update when there is no data for the current selection check box.
Click OK to apply the changes.
Open the document and view the widget in one of two ways:
Select Flash Mode from the Home menu.
If Flash Mode is not available in the Home menu, you must make Flash Mode available in the document. For steps, see Defining which display modes are available to users.
Select Interactive Mode from the Home menu.
DHTML must be enabled in order to display widgets in Interactive Mode in MicroStrategy Web. For instructions to enable DHTML, see Enabling DHTML in MicroStrategy Web.
Right-click the widget and select Properties. The Time Series Slider dialog box opens.
From the Selectable Area drop-down list:
To use the slider as the selector, select Slider.
To use the primary graph as the selector, select Primary Graph.
You can ensure that target Grid/Graphs
and panel stacks are updated when a user hovers over the slider or primary
graph. To do so, select the Change Selection
on Mouse Over check box.
Note: This option is only available when Selectable
Area is set to Primary Graph.
Click OK to apply the changes.
Open the document and view the widget in one of two ways:
Select Flash Mode from the Home menu.
If Flash Mode is not available in the Home menu, you must make Flash Mode available in the document. For steps, see Defining which display modes are available to users.
Select Interactive Mode from the Home menu.
DHTML must be enabled in order to display widgets in Interactive Mode in MicroStrategy Web. For instructions to enable DHTML, see Enabling DHTML in MicroStrategy Web.
Right-click the widget and select Properties. The Properties dialog box for the widget opens.
To specify that targets are updated when a user hovers the cursor, select the Change Selection on Mouse Over check box.
Click OK to apply the changes.
Related topics